Doing a quick deviation from my documentation on the Iron Man music visualization. Figured I'd put up a quick tutorial on creating a shader that utilizes two UV sets on a mesh. I had trouble finding a good example of this on the web. Feel free to post in the comments if there is a good one someone knows about that I might have missed. The software I'm using for the following tutorial is Unity 3, (pro or free version) Autodesk Maya (any version), and the Strumpy shader editor for Unity.
This should work without any issue in Unity 4 and Unity 5. Once I complete this project, I'll re-explore this in Unity 5 to confirm. Anyone is welcome to comment as well to confirm this works in 5.
1. Create a sphere in Maya
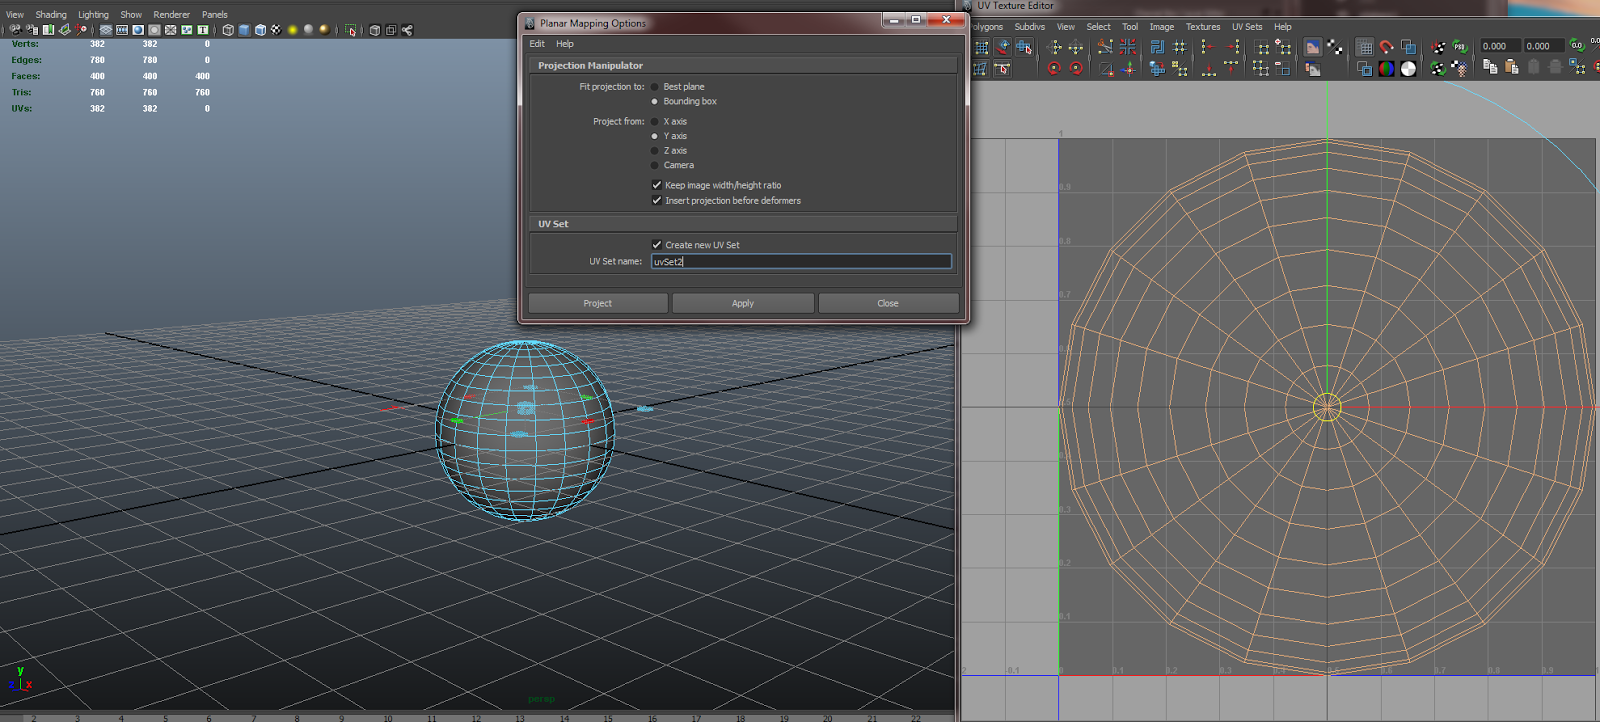
In the options box, make sure Sawtooth at poles is selected for texture mapping
This will create a UV layout as shown in the UV texture editor to the right of the image.
2. Create a secondary UV set.
For this step, I used a planar projection on the y-axis. Make sure you have Create new UV Set checked and designate a new name
3. Import the new asset into Unity
I've included a screen shot of my settings. Typically Unity uses the second UV set for light mapping purposes. I have Swap UVs and Generate Lightmap UVs unchecked so what I created in Maya matches what gets imported to Unity
4. Strumpy shader graph setup

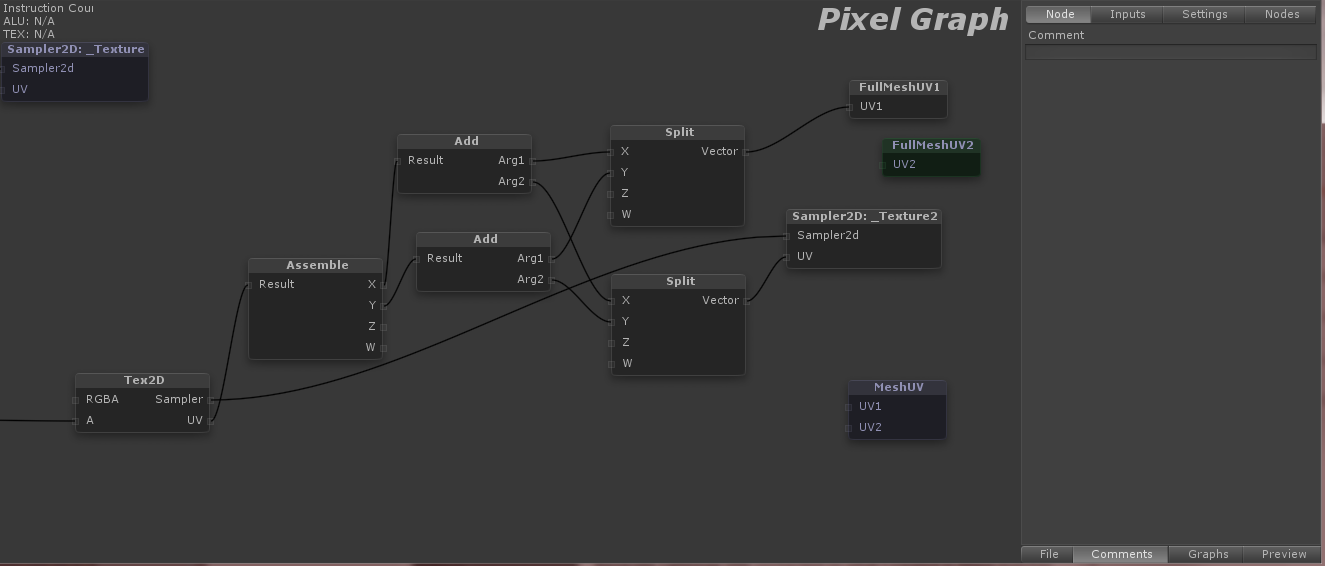
You'll want to use the FullMeshUV1 and 2 or the MeshUV nodes to access the two UV channels
I then use a Sampler2D to get the texture and its UVs. Now the next part is optional; If you want the texture channel controls that show up in the inspector to be operational, then we will need to combine the UVs from the texture and the mesh
Use split to breakdown the UV vector into it's X and Y channels. Use the add to combine the texture UV channel and the mesh UV channel. Next, assemble merges these X/Y channels back into one vector. Finally, you can attach that to a Tex2D node and use the RGBA from there.
In my example, I use the alpha channel from the second UV texture and UV mesh to mask out parts of the first UV layout. Since my object is a sphere, the Y-axis projection on UV channel one serves as the base design while the second UV channel which was mapped out in a sawtooth pattern, allows you to use a simple gradient to mask out a ring-shaped section of the original texture. Even better, you can now use the offset y on the second channel to animate the gradient up/down exposing different parts of the base texture! Examples below.
Original texture with the Y-axis projection on UV channel 1
Second texture on UV channel 2. This is actually just a straight horizontal gradient.
The combined effect of the two. Now you can animate a ring emanating outwards or inwards with only one simple number: 2nd texture's y offset.
This should work without any issue in Unity 4 and Unity 5. Once I complete this project, I'll re-explore this in Unity 5 to confirm. Anyone is welcome to comment as well to confirm this works in 5.
1. Create a sphere in Maya
In the options box, make sure Sawtooth at poles is selected for texture mapping
This will create a UV layout as shown in the UV texture editor to the right of the image.
2. Create a secondary UV set.
For this step, I used a planar projection on the y-axis. Make sure you have Create new UV Set checked and designate a new name
3. Import the new asset into Unity
I've included a screen shot of my settings. Typically Unity uses the second UV set for light mapping purposes. I have Swap UVs and Generate Lightmap UVs unchecked so what I created in Maya matches what gets imported to Unity
4. Strumpy shader graph setup

You'll want to use the FullMeshUV1 and 2 or the MeshUV nodes to access the two UV channels
I then use a Sampler2D to get the texture and its UVs. Now the next part is optional; If you want the texture channel controls that show up in the inspector to be operational, then we will need to combine the UVs from the texture and the mesh
Use split to breakdown the UV vector into it's X and Y channels. Use the add to combine the texture UV channel and the mesh UV channel. Next, assemble merges these X/Y channels back into one vector. Finally, you can attach that to a Tex2D node and use the RGBA from there.
In my example, I use the alpha channel from the second UV texture and UV mesh to mask out parts of the first UV layout. Since my object is a sphere, the Y-axis projection on UV channel one serves as the base design while the second UV channel which was mapped out in a sawtooth pattern, allows you to use a simple gradient to mask out a ring-shaped section of the original texture. Even better, you can now use the offset y on the second channel to animate the gradient up/down exposing different parts of the base texture! Examples below.
Original texture with the Y-axis projection on UV channel 1
Second texture on UV channel 2. This is actually just a straight horizontal gradient.
The combined effect of the two. Now you can animate a ring emanating outwards or inwards with only one simple number: 2nd texture's y offset.


No comments:
Post a Comment