Monday, March 30, 2015

Sunday, March 22, 2015

Iron Man UI: Almost there.... plus a new song called "Renewal"

It's been a couple weeks since I last posted anything about this project.  It's almost done.  I have a bunch of additions.  Last time I mentioned the need for one big unifying piece to help tie all the separate elements.  Here is a quick image of what that looks like:
This consists of a bulls eye element in the middle which can rotate independently from the rest of the parts.  Since there is so much other movement going on in the visualization, I elected to keep this element completely static.  To represent the music, it has a texture ring which emanates outwards exposing parts of the complete design.   The tutorial in my previous post demonstrates how to do this effect.

Finally, I added a few arcs that rise and sink around the central column.

There are a few more finishing touches like showing how this whole thing moves through space which I'll get to in my next post.

I got a bit side tracked because I had to compose a new piece of music for this animation. The piece of music is all finished and should go live later this week.  For now, you can check out a snippet of it in this video.  It's called "Renewal"


Much more awesomeness to come so stay tuned....

Thursday, March 12, 2015

Creating a 2 UV set shader in Unity

Doing a quick deviation from my documentation on the Iron Man music visualization.  Figured I'd put up a quick tutorial on creating a shader that utilizes two UV sets on a mesh.  I had trouble finding a good example of this on the web.  Feel free to post in the comments if there is a good one someone knows about that I might have missed.  The software I'm using for the following tutorial is Unity 3, (pro or free version) Autodesk Maya (any version), and the Strumpy shader editor for Unity. 

This should work without any issue in Unity 4 and Unity 5.  Once I complete this project, I'll re-explore this in Unity 5 to confirm.  Anyone is welcome to comment as well to confirm this works in 5.

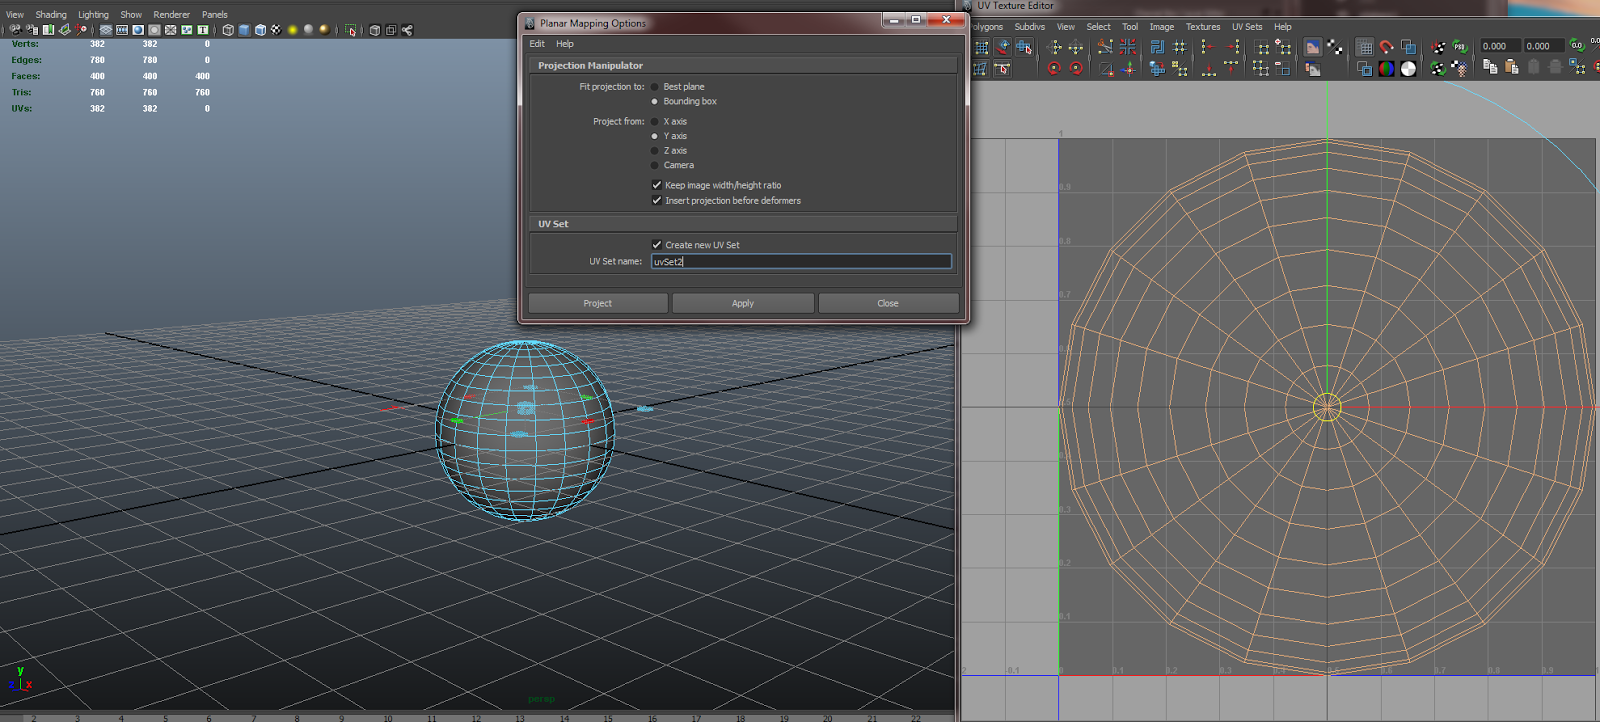
1. Create a sphere in Maya


In the options box, make sure Sawtooth at poles is selected for texture mapping
This will create a UV layout as shown in the UV texture editor to the right of the image.

2. Create a secondary UV set.  


For this step, I used a planar projection on the y-axis.  Make sure you have Create new UV Set checked and designate a new name

3.  Import the new asset into Unity


I've included a screen shot of my settings.  Typically Unity uses the second UV set for light mapping purposes.  I have Swap UVs and Generate Lightmap UVs unchecked so what I created in Maya matches what gets imported to Unity

4. Strumpy shader graph setup


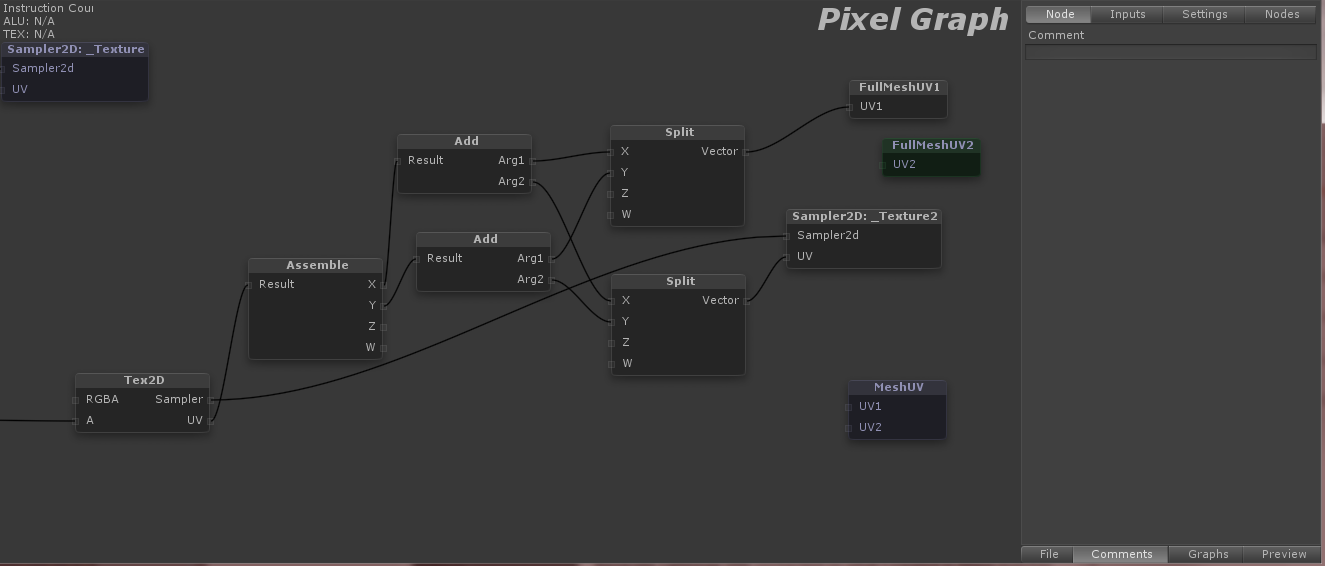
You'll want to use the FullMeshUV1 and 2 or the MeshUV nodes to access the two UV channels

I then use a Sampler2D to get the texture and its UVs. Now the next part is optional; If you want the texture channel controls that show up in the inspector to be operational, then we will need to combine the UVs from the texture and the mesh


Use split to breakdown the UV vector into it's X and Y channels.  Use the add to combine the texture UV channel and the mesh UV channel. Next, assemble merges these X/Y channels back into one vector.  Finally, you can attach that to a Tex2D node and use the RGBA from there.

In my example, I use the alpha channel from the second UV texture and UV mesh to mask out parts of the first UV layout.  Since my object is a sphere, the Y-axis projection on UV channel one serves as the base design while the second UV channel which was mapped out in a sawtooth pattern, allows you to use a simple gradient to mask out a ring-shaped section of the original texture.  Even better, you can now use the offset y on the second channel to animate the gradient up/down exposing different parts of the base texture!  Examples below.


Original texture with the Y-axis projection on UV channel 1


Second texture on UV channel 2.  This is actually just a straight horizontal gradient.


The combined effect of the two.  Now you can animate a ring emanating outwards or inwards with only one simple number: 2nd texture's y offset.


Friday, March 6, 2015

Ironman UI: Big updates with lots of new stuff!!!

I've got a bunch of new work to show for my Iron Man inspired music visualization HUD.  95% of the elements are place.  Here's a breakdown of what's new including a video showing everything in action.


Frequency meters now change in brightness based on their channel's amplitude.  Its much easier to see this animated, but here is a quick image showing what I mean.

Notice how the bands in the 300 range are brighter than the bands in the 100 or 600 range.  This is a nice indication of that the amplitude is greater for that particular frequency range.  You'll notice not all the bands are animating.  Right now I have each channel visualizing a different frequency range.  In a live setting with various microphones, the effect will look more like this.

This would be 8 frequency ranges per channel.

In the center, I've got a few standard equalizer bars.  Each one representing a different frequency range or microphone.


The outer ring that consists of many small slivers is a really cool part to all of this.  I wanted to take the traditional equalizer bar graphs that are typically associated with music visualizations and combine them with particle trails which are another common staple.  The beauty of particles and particle trails is that they show history.  As the particle ages, it fades away, changes color, flies off in some direction based on turbulence fields or some other particle system effector.  This outer ring combines both of these elements into one.
In this image, the light starts on the far left and moves in an arc to the right.  It's currently tied to highest frequency range so only high pitched singing or cymbal hits will affect it.  As the left side reacts to the music, each subsequent segment responds to the segment preceding it.  This sets up a really cool chain reaction where you can watch the history of high-pitched cymbal hits. It takes about 6 seconds before this history vanishes.  All of this is procedurally generated so you can control which objects get copied, how many, their overall position in the space, scale variation, color.....well the list goes on.  Here is close up of that arc band.

All of these different elements are actually constructed/scripted in such a way that they can be easily modified or made to look different from their original intentions.  I try to build in this flexibility so I can repurpose some parts in other visualizations or reuse them in this visualizatio.

To conclude all this, I've got a short video here.  Not sure why I'm on a jazz kick lately but the visuals are reacting to another composition I've started working on today.  Enjoy!


We're getting into the home stretch now.  I need to balance all of these elements a bit better, separate them some more on the Y-axis and get a background in place.  Also there is one big unifying piece that needs to be put into place.  Looking to wrap this up in the next week. Stay tuned...

Live Music Visuals: Galaxy v2.0 - Burning Bridges

Still working through Unity2019 and all the preview packages.  Trying to get some cool space stuff that reacts to music.  Second attempt h...